Please ensure Javascript is enabled for purposes of website accessibility

Category: Health and Wellness

  • Five triggers that cause sciatica to flare up

    Five triggers that cause sciatica to flare up

    Sciatica is a common cause of lower back and leg pain in American adults. Some people have constant pain in the sciatic nerve while others experience frequently recurring flare-ups. 

    Certain habits and lifestyle choices can contribute to flare-ups of sciatic nerve pain. Take a look at some of the factors that trigger sciatica below to identify areas where you need to make some changes. 

    Five triggers that cause sciatica flare-ups

    1. Smoking — Smoking causes your blood vessels to constrict, which restricts blood flow from reaching your lower back. This causes the muscles to grow more tense and stiff and reduces lubrication in the joints of your spine and hips. This can result in more frequent flare-ups of irritation and inflammation that cause sciatica.
    2. Excess weight — Too much body weight increases strain on the lower back. This results in an increase of pressure on the spine that can irritate the sciatic nerve. Try to maintain a healthy weight level to help prevent sciatica.
    3. Prolonged sitting — Sitting for extended periods of time puts strain on your lower back that can irritate the sciatic nerve. If you have a job that requires a lot of sitting, make sure you take frequent breaks to move around and stretch to help prevent sciatica flare-ups.
    4. Improper footwear — Poorly fitting footwear or footwear without enough arch support can cause problems in your ankles, knees, hips and back, including sciatica flare-ups. Invest in properly fitted footwear or orthotics to help reduce flare-ups.
    5. Poor diet — Not getting enough lean proteins, unsaturated fats, vitamins and minerals can keep your muscles, ligaments, tendons and other parts of your body from functioning at their fullest. Make sure you’re eating well to help fuel your body and avoid unhealthy foods that restrict your blood flow or cause you to gain too much weight. 

    Visit SSOR for sciatica treatment

    Is sciatica causing pain in your lower back and legs that keeps you from enjoying many of your favorite activities? Our team at SSOR can provide physical therapy treatments to help reduce and prevent sciatic nerve pain. Contact our team today for more information about sciatica or to schedule an initial appointment. 

  • Three exercises to avoid when you have neck arthritis

    Three exercises to avoid when you have neck arthritis

    Arthritis can affect any of the joints in your body. While many people think of arthritis as something that affects the hips, knees and hands, it can also affect the vertebrae in the spine and other smaller joints. When arthritis affects the vertebrae in your cervical spine, or rather, your neck, it can make your daily life more difficult.

    Exercising is a great way to help reduce pain and stiffness caused by arthritis. Stronger muscles provide better support and mobility in the affected areas. However, if you have neck arthritis, there are a few exercises you’re better off avoiding if you don’t want to make your pain worse. 

    Three exercises to avoid when you have neck arthritis 

    1. Situps — Situps are helpful exercises for engaging the muscles in your core, which helps reduce lower back pain. However, situps can often lead to back pain and neck pain when done improperly. If you have arthritis in the neck, it’s best to avoid situps unless instructed otherwise by your physical therapist.
    2. Bridges — Bridges are exercises that involve lying on your back and raising your hips into the air while keeping your feet flat on the ground. These are great exercises for engaging the muscles in your core and thighs, but they put a lot of pressure on the neck. This can exacerbate your symptoms if you have neck arthritis, so you may want to avoid bridges and other similar exercises.
    3. Military press — A military press is any exercise that involves pushing a weight above your head. Military presses are useful for helping to strengthen the shoulders and even the neck muscles. However, when you have arthritis in the neck, these exercises can cause a lot of pain. 

    Visit Excel Sports & Physical Therapy for neck arthritis treatment

    Are you living with arthritis in the neck that affects your daily life? Our physical therapists at Excel Sports & Physical Therapy can help you figure out which exercises to try and which ones to avoid. Contact our team today for more information about neck arthritis or to schedule an initial appointment.
  • Two sciatica pain treatment exercises used in El Paso, TX

    Two sciatica pain treatment exercises used in El Paso, TX

    Sciatica is a condition where the sciatic nerve is being irritated at its root in the lower back or along its length. The irritation of one of the sciatic nerves can lead to pain, and this pain can feel like it’s running from your lower back, through the buttock and down the back of the leg. To help treat the pain of sciatica, physical therapists in El Paso, Texas, can use several types of stretching exercises. 

    1. Knee to chest stretch

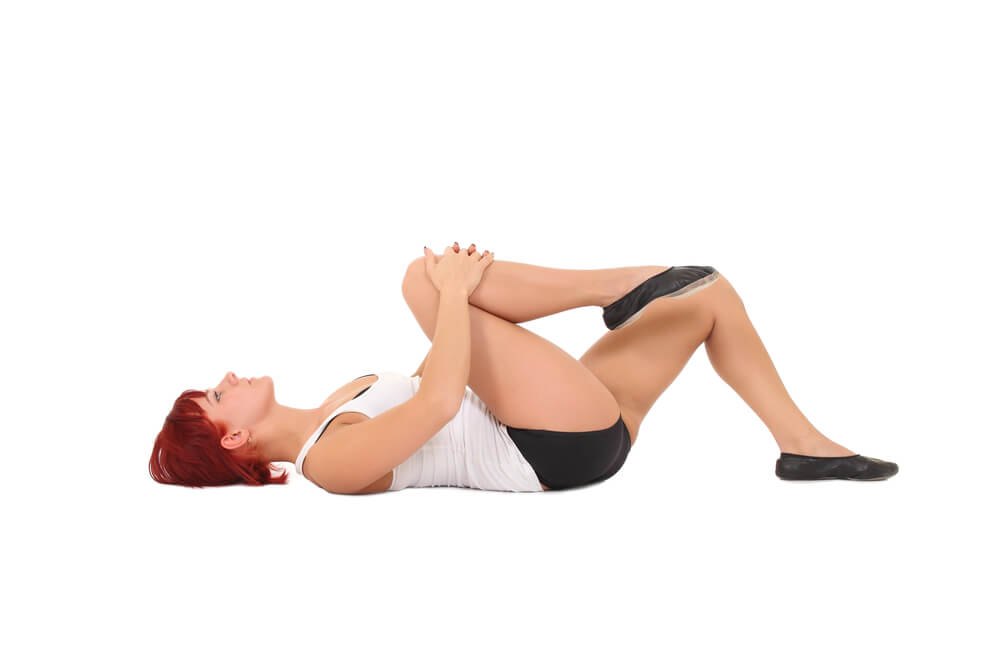
    Tight muscles in the butt and upper leg can increase the strain on your lower back, and this strain can cause more sciatic nerve irritation and pain. One stretch that can help with sciatica pain treatment by stretching the butt and thigh muscles is the knee to chest stretch. 

    Begin this stretch by lying down on your back on the floor. To make this position more comfortable, you can lie on a yoga mat and place a folded towel under your head. Bend both your knees until your feet are flat on the floor, and slightly tuck your chin to finish getting into the exercise’s starting position. 

    From the starting position, raise your right leg so that your knee moves toward your chest. You should feel a stretch in your leg and butt. Once you feel the stretch, place your hands on your knee or around your thigh to help hold the stretch. This should allow you to hold the stretch for about 20 to 30 seconds before returning to the starting position. Repeat these steps with your left leg, and continue to repeat them until you’ve stretched each leg three times. 

    1. Back extensions

    Another sciatica pain treatment exercise your therapists may have you do is back extensions. This exercise is intended to stretch the muscles of your lower back, and it can also help open more space between your lower back vertebrae. Both of these things can help reduce sciatic nerve irritation and help decrease sciatica pain. 

    To begin this exercise, lie facedown on the floor, and bend your arms so that you’re resting on your forearms. Position your head so that you’re looking down at the floor and your neck is straight. From this starting position, use your arms to push yourself up so that your upper torso is off the floor, but be sure to keep you’re still keeping your neck straight. This should cause your back to arch and lead to a stretch in your stomach and lower back. Hold this stretch for five to 10 seconds before returning to the start position, and you should take a few seconds to rest before repeating these steps again until you’ve done the stretch eight to 10 times total. 

    Border Therapy Services in El Paso, TX, can help you find effective sciatica pain treatment

    One condition we have lots of experience with at Border Therapy Services is sciatica, and we have seven clinics in the El Paso area that can help you treat this back condition. Our clinics offer free screenings to ensure that sciatica is what’s causing your pain. We also provide each patient with an individualized therapy plan, and your plan may be built using therapy techniques like: 

    Are you ready to take the next step to get our help with your sciatica? Contact us today for more information or to schedule an initial appointment. 
  • Two stretches that can help treat arm pain after a car accident

    Two stretches that can help treat arm pain after a car accident

    There are many areas of the body that can be injured or affected by a car accident. The arms can be the part of your body that are the most painful after such an incident, and this pain is often related to arm muscles being overstretched. It can also be the result of tension from the accident being stored in your arm muscles. Stretching can be helpful for arm pain and tension; here are two stretches that can be particularly helpful if you have arm pain after a car accident: 

    1. Biceps rotation stretch

    Before you start doing stretches for arm pain after a car accident, it’s a good idea to confirm the cause of your pain. The impact from a car accident can cause tension to develop in the muscles and inflammation to develop in the tendons of your arms. If you’re feeling this tension and pain in your biceps, the biceps rotation stretch is an option to consider. 

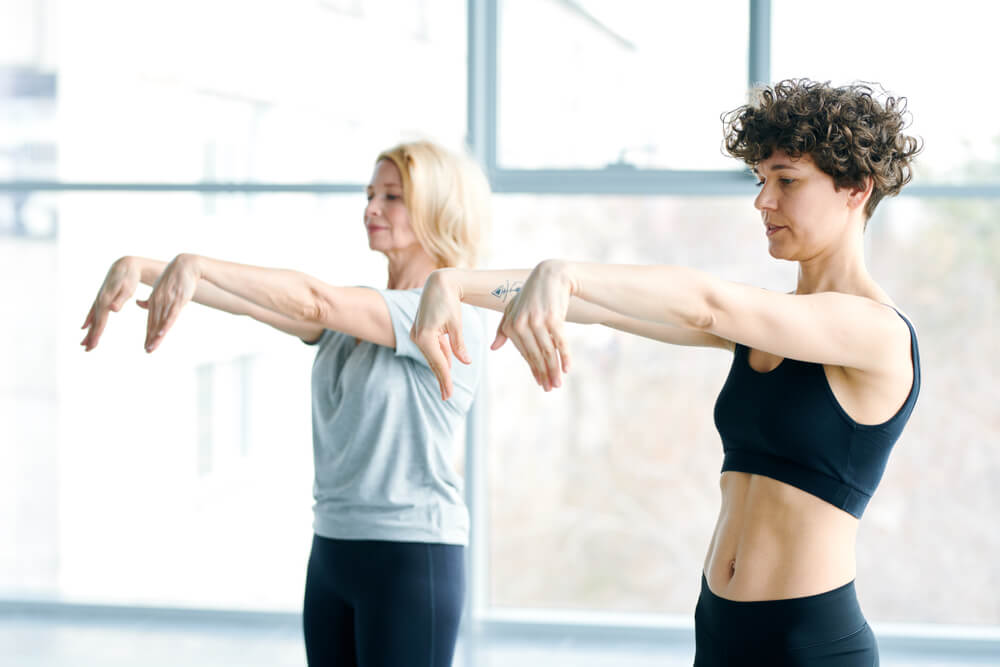
    The biceps rotation stretch starts with you standing up straight; make sure you have enough space to raise your arms without hitting the walls or other objects. Once you’re sure you have enough space, slowly raise your arms to shoulder height with your palms facing down to get into the starting position for this stretch. 

    From this position, slowly rotate your arms until your palms are facing behind you, and you should continue the rotation until you feel a moderate stretch in the biceps. Hold this position for 20 to 30 seconds to complete one repetition. Make sure you’re keeping your arms up during the entire stretch. After the time is up, rotate your arms back to the start position and then try to repeat the steps until you’ve done the stretch eight to 10 times. 

    1. Forearm stretch

    Another option that can help decrease arm pain after a car accident is doing forearm stretches. These are intended to help stretch flexor and extensor muscles in the forearms. 

    To begin stretching the forearms, you should extend your right arm out in front of you with the palm down. This is the starting position for the forearm flexor stretch. From this position, let your hand drop toward the ground. Then, use your left hand to gently pull down on your right hand until you feel a stretch in the top of the forearm. Hold this stretch for about 30 seconds before releasing and then raise your hand so that your palm is facing out. Gently apply pressure again with your left hand until you feel a stretch in the bottom of your forearm. Hold this stretch for about 30 seconds as well and then release the stretch. Continue to repeat the steps for these stretches until you’ve done each of them 10 times.

    Arm pain after a car accident can be treated at SSOR

    SSOR has a team of physical therapists ready to help treat post-car accident arm pain. We can also help you treat other injuries caused by car crashes. Our team offers complimentary screenings to help isolate the source of your pain, and this information will be used to build you a personalized treatment plan. 

    Come find out how effective our help can be. Contact us today for more information or to schedule an initial appointment. 
  • Three ways you can release your muscle tension

    Three ways you can release your muscle tension

    Do you deal with aches and pains every day? Odds are that tense muscles could be the reason for this daily discomfort. If you have tense muscles, your go-to might be to do some passive stretching, which can be very helpful if done properly. But figuring out how to release muscle tension may require more than just stretching alone. Here are three options you can pair with stretches to help reduce muscle tension: 

    1. Increase core strength

    People who are trying to figure out how to release muscle tension should consider looking at their core. The core is a group of muscles responsible for stabilizing your pelvis and spine. Some of the muscles that are included in this group are the abs, obliques and back muscles, and weakness in such muscles can lead to a misaligned spine and pelvis. In turn, misalignment can easily create tension and other problems in muscles that aren’t in the core. One way to counteract this chain of events is to start increasing your core with core stability exercises, and this can include doing exercises like planks. 

    1. Do more resistance training

    Figuring out how to release muscle tension can also involve doing more resistance training. This type of training is actually intended to boost both strength and muscle flexibility, and a study published by the National Institutes of Health (NIH) reveals that resistance training can be better for improving flexibility than passive stretching. The key is to make sure you’re using the full range of motion of the muscle during each rep. For example, focus on getting your knee as close to the floor as possible and then straighten the legs completely during lunges. 

    1. Try out a foam roller

    You’ve probably seen foam rollers at the gym or at your local fitness store. But you may not have figured out how this tool can help release tension in your muscles. Foam rolling falls into a category that physical therapists call myofascial release. The goal of myofascial release is to apply pressure and specific movements to tense soft tissue, such as muscles. With foam rolling, it’s the combination of the roller and your body weight that supplies the pressure and movement, and it can be used to target tense muscles in the back, legs and many other areas. It’s a good idea to combine stretching and foam rolling to release the most tension from tight muscles. 

    SOL Physical Therapy can help you figure out how to release tension in chronically tight muscles

    At SOL Physical Therapy, we’ve seen how much pain can be caused by overly tense muscles. If you’re looking for a way to release this tension, our team offers free screenings to help you determine the source of the tension. We can also build you a personalized treatment plan designed to treat chronically tense muscles, and this plan may include therapy techniques such as: 

    Don’t wait to start getting our help with your tense muscles. Contact our team today for more information or to schedule an appointment. 

  • Three options to treat wrist pain from bending or pressure

    Three options to treat wrist pain from bending or pressure

    Bending your wrist allows you to perform many routine movements that you do every day. Also, the wrist typically has pressure placed on it many times per day. When you have an issue like carpal tunnel syndrome or arthritis, your wrist could hurt when it’s bent or pressure is put on it. If you have wrist pain in such scenarios, there are three treatment options that can help. 

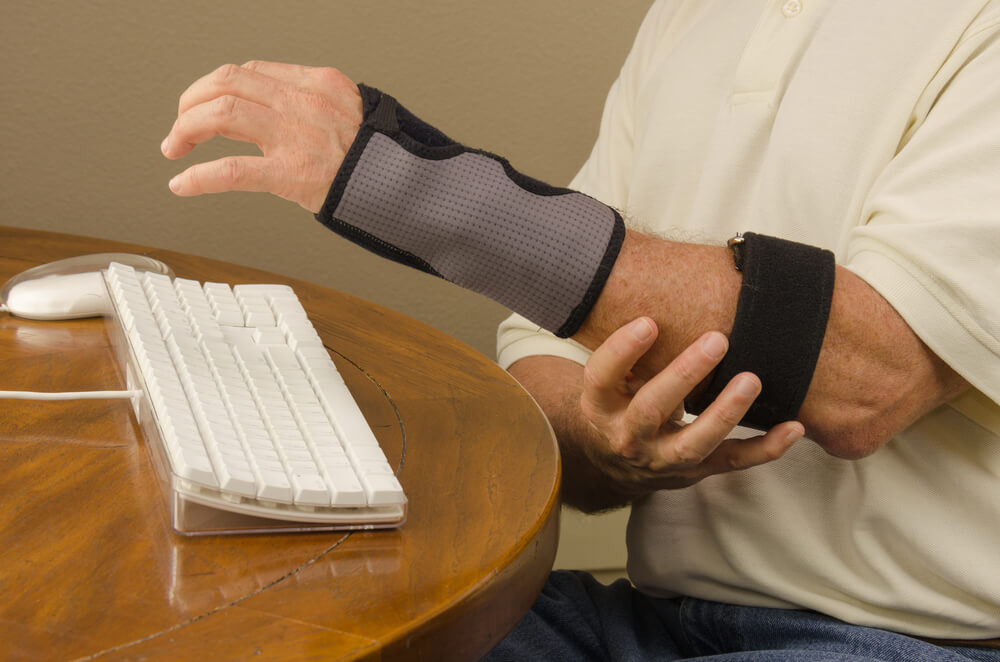
    1. Wearing a wrist brace

    Wearing a wrist brace is one way to reduce pain in a wrist that hurts when it’s bent or pressure is put on it. Such braces are designed to allow the wrist less freedom of movement, you probably won’t be able to bend your wrist far enough to cause pain. Also, wrist braces are designed to provide support to this joint. This can be helpful since the increased support can allow you to place pressure on the wrist without causing pain. This treatment option is easy to find, and they’re available at many online stores and even at your local drugstore. 

    1. Switching to ergonomic office equipment

    Ergonomics is the study of the way the human body moves, and this information is typically used to design more comfortable and effective office equipment. For example, ergonomic keyboards are designed to better support your wrists while you type. Also, ergonomic recommendations made by researchers have led to the development of the vertical mouse. A vertical mouse looks like a standard mouse that’s been placed on its side, and it can help position your wrist and forearm more naturally. In turn, this can help decrease your risk of repetitive motion injuries. A vertical mouse can also help decrease pain from bending or putting pressure on the wrist.   

    1. Participating in physical therapy

    For many people, the pain that bending or putting pressure on the wrist causes can be treated with physical therapy. Physical therapists can show you how to do exercises that stretch and strengthen the wrist and its supporting structures. They can also use techniques like joint mobilization to increase your ability to move your wrist without pain. These professionals can even make ergonomic recommendations that can help you experience less wrist pain at home and at work. 

    Excel Sports & Physical Therapy offers help treating wrist pain

    If your wrist hurts when you bend it or put pressure on it, Excel Sports & Physical Therapy has the experience to help you. Our team can build a personalized treatment plan for your wrist issue, and these plans are informed by our free screenings. We use multiple therapy techniques in our treatment plans, and some techniques that may help us meet your needs include: 

    Contact our team today for more information or to schedule an initial appointment to begin treating your wrist pain. 

  • Two tips for treating kneecap pain when bending the knee

    Two tips for treating kneecap pain when bending the knee

    The knee is one of the most mobile joints in your body, but this mobility also makes it a target for many types of injuries. Feeling pain under or around your kneecap when bending your knee can be a sign of such an injury. This type of pain can make it difficult to move normally, and it can interfere with your ability to do routine tasks like sitting down. If bending your knee is causing you pain, here are two tips that can help treat it: 

    1. Protect your knee


    Many injuries that cause kneecap pain when bending the knee occur while playing sports. This type of sports injury is usually caused by a sudden change of direction. It could also be related to a sudden stop or an impact to the front of your knee. When the injury first occurs, you might hear a sound like a pop from your knee. Also, people tend to feel moderate to severe pain immediately after the injury happens. 

    However, some people will ignore it and keep playing. The better course is to stop what you’re doing and take steps to protect your injured knee. This may involve wrapping the knee or wearing a brace. It could also involve using crutches so that you can move around without putting strain on the injured knee. 

    1. Let your knee rest


    Resting your knee is an important step to take when you have an injury that’s causing kneecap pain when bending your knee. This is an important tip because it allows your body to focus its energy on healing. Resting the knee is typically most helpful in the first few days after the injury happens, and your doctor or physical therapist might want you to alternate resting and specific movements after a few days. This combination can help maintain the range of motion of your knee as you’re healing. Also, you might have to refrain from doing strenuous exercise for a while after a knee injury. That means no running or jumping. So, sit back and find a good show to binge-watch while your knee is getting its rest. 

    Whatcom Physical Therapy can help treat kneecap pain from knee bending

    After you rest your knee, your doctor might recommend that you seek physical therapy to help treat your knee pain. Whatcom Physical Therapy has an experienced team of therapy specialists who can help. We offer free screenings, and these allow us to determine how your knee injury is affecting you. Using this information, our team can then build you a personalized treatment plan to fit your specific needs. This plan can include multiple beneficial therapy methods, and some methods we can use to help your knee are: 

    Are you ready to take the next step to get our help with your kneecap pain when bending your injured knee? Contact our team today for more information or to schedule an initial appointment. 
  • Two stretches that can help with shoulder pain from sleeping

    Two stretches that can help with shoulder pain from sleeping

    The shoulder is a complex joint, and it’s used to do many tasks that you do every day. While sleeping is usually good for the body, it can cause issues in the shoulder and neck. Usually, such issues are a result of poor head and neck support, but they could also be caused by sleeping in a position that puts too much strain on the neck and shoulder. If you’re dealing with shoulder pain from sleeping issues, there are two stretching exercises that can help treat your pain. 

    1. Head tilt

    For many people, shoulder pain from sleeping is located in the top of the shoulder, and it may run all the way into the neck. To help treat pain in these areas, the head tilt stretch is an excellent option. 

    Start the head tilt by sitting up straight in a stable chair. You’ll also want to position your head so that it’s centered over your shoulders, and your arms should be allowed to hang straight down by your sides. Once your body is in this position, you’re in the starting position for this stretch. From here, slowly tilt your head to the left like you’re trying to touch your left ear to your left shoulder. Keep tilting your head until you feel a stretch in the right side of your neck. Then, hold the stretch for 15 to 20 seconds before returning to the start position. Repeat these steps to stretch the other side of your neck, and continue repeating them until you’ve stretched both sides three to five times. 

    1. Child pose

    Child pose is a position you may have heard of because it’s commonly used in yoga routines. This pose is also a fantastic stretch for the muscles on the back of your shoulder, and that’s why it can be so helpful to people with shoulder pain from sleeping. 

    To prepare yourself for the child pose, kneel down on the floor with the tops of your feet flat on the floor. You’ll then want to let your butt drop until it’s resting on your legs. From this starting position, slowly bend forward from the waist with your arms straight out above your head. Continue to bend forward until your palms touch the ground, and once they do, let gravity press you toward the floor to stretch the back of your shoulders. Hold this position for about a minute, and then you can slowly return to the starting position.

    Find more treatment options for shoulder pain from sleeping at Advent Physical Therapy

    Are you tired of living with shoulder pain from sleeping? Advent Physical Therapy has physical therapy that can help you. Our team will start your treatment process by doing a free screening to determine the source of your pain. Then, we’ll create a personalized treatment plan for you that uses therapy techniques such as: 

    Contact our team today for more information or to schedule an initial appointment to start treating your shoulder pain from sleeping.

  • Three issues that can be treated by senior balance training

    Three issues that can be treated by senior balance training

    It’s common knowledge that seniors can have more trouble keeping their balance. But you might not realize that balance problems are often caused by a deeper issue. Physical therapy is one of the options that can help treat underlying issues causing balance difficulties. In fact, many physical therapy teams offer balance training for seniors, and these programs can help address three common issues that cause loss of balance. 

    1. Weak core muscles

    The core muscles are responsible for supporting your spine and upper body. This makes them a major player in your ability to balance, and when they’re weak, balancing can be much harder. Balance training plans for seniors can be designed to strengthen the core muscles. One therapy method that can be included to help strengthen the core is therapeutic exercises, and therapy specialists can show you lots of different exercises to target the abs, pelvic floor, back, obliques and other weak core muscles. 

    1. Stiff and painful joints

    Seniors are also more likely to be dealing with stiff, sore joints, and these can make balancing a challenge. The most common issue that leads to balance-affecting joint problems is osteoarthritis. This condition is caused by the natural wear and tear on the joints over time, and it often leads to the wearing out of cartilage that keeps the joints mobile and supple. When the cartilage in joints is worn away, the ends of bones can rub together. This rubbing can make the joints harder and more painful to move. The more difficult it is to move joints like your knees, the harder it is to keep your balance and avoid falls. Balance training for seniors can include multiple therapy techniques designed to reduce pain and stiffness in your joints. In turn, this can make it easier to keep your balance. 

    1. Inner ears

    Balance training for seniors can also be designed to help people with inner ear problems. The inner ear is crucial to the body’s ability to balance, but issues like benign paroxysmal positional vertigo (BPPV) can cause balance problems centered on the inner ear. BPPV is when natural crystals in the inner ear break loose can float into the inner ear canals. The movement of these crystals sends false signals to the brain, and these signals can lead to vertigo and other balance issues. As part of your balance training, physical therapists can use techniques like the Epley maneuver to help treat the cause of BPPV. In turn, this can help you feel more balanced as you move around. 

    Find help with balance training for seniors at Panther Physical Therapy

    At Panther Physical Therapy, our team has helped many people find effective senior balance training. We offer free screenings to help you get started with your therapy, and these screenings are designed to help us discover the source of your balance problem. Using this information, our team will build you a therapy plan that’s personalized to your needs. Your plan will include multiple beneficial therapy techniques, and some of the techniques we may include in your plan are: 

    Take the next step to get our help with improving your balance. Contact our team today for more information or to schedule an appointment.

  • Two easy meniscus tear physical therapy exercises

    Two easy meniscus tear physical therapy exercises

    A meniscus tear in Jacksonville, North Carolina, can cause symptoms like pain and decreased range of motion. Using therapeutic exercises, physical therapists in your area can help treat injuries to the meniscus. There are two exercises that are perfect examples of the kind you’ll learn in physical therapy for meniscus tears. 

    1.   Heel slides

    One goal of therapeutic exercises used for meniscus tears is to improve your range of motion. This is the extent to which you can move your knee joint, and it can be greatly reduced by this type of knee injury. To help counteract decreased range of motion, your physical therapist may introduce you to the heel slide. 

    To do heel slides, you’ll need to lie down on your back on the floor, and you may want to lie on a yoga mat to increase your comfort. Once you’re lying down, bend your right knee so that your foot is resting flat on the floor. This is the starting position for heel slides. From this position, slowly slide your heel along the floor until it’s as close to your butt as possible. After you’ve moved the heel as far backward as you can, slowly return your foot to the starting position. Repeat the movement until you’ve done 10 reps with your right leg, and then repeat these steps to do 10 reps with your left leg. 

    2.   Short arc quad exercise

    Another type of exercise you’ll be asked to do in physical therapy for meniscus tears is strengthening exercises. These exercises are used for several reasons. For one thing, they can help increase the strength of muscles that support the knee. They’re also intended to improve knee alignment and reduce your risk of future knee injuries. An exercise from this category that may be included in your therapy plan is the short arc quad exercise. 

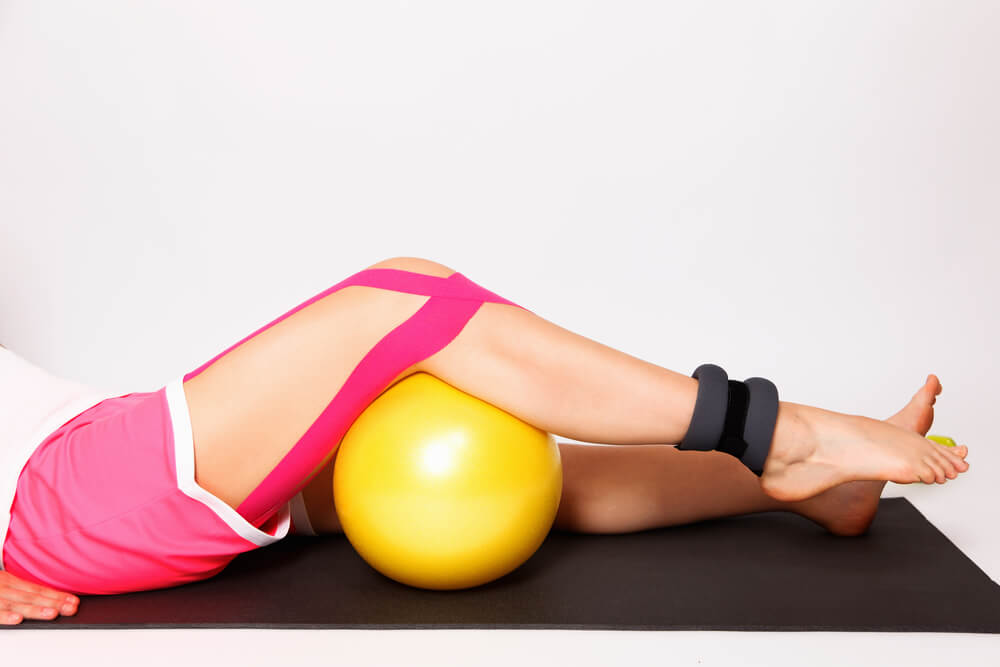
    The quadriceps, or quad, is a large muscle on the front of your thigh, and it helps bend and support the knee. The short arc quad exercise is designed to target this muscle. To begin this exercise, lie down on your back on the floor with a rolled-up towel under the affected knee. You can also use a round object like a soccer ball or basketball in place of the towel. Once the towel is under your knee, tighten your quad muscle to straighten your knee. Hold this position for three to five seconds, and then slowly relax the quad and bend your knee. Try to repeat this exercise 10 times with the injured leg. You can also use these steps on the unaffected leg as well. 

    Peak Performance in Jacksonville, NC, has meniscus tear physical therapy for you

    Peak Performance has a clinic in Jacksonville, and our team here is experienced with many knee injuries and medical conditions. We offer free screenings that can help you learn if your pain is caused by arthritis, meniscus tears or another knee issue. Our team can also create personalized therapy plans for every patient, and our plans may include therapy techniques such as: 

    Take the next step to get our help with your knee pain. Contact us today for more information or to schedule an initial appointment. 

  • Five tips for running with knee arthritis in Blaine, WA

    Five tips for running with knee arthritis in Blaine, WA

    A lot of people in Blaine, Washington, love to go on runs to maintain their physical fitness and to clear their minds. Unfortunately, your ability to run can be limited by painful conditions like arthritis in the knee. However, just because you have a condition like arthritis, it doesn’t mean that you need to sit on a couch for the rest of your life.

    You might be surprised that you can actually keep running if you have knee arthritis. But there are some tips you should follow. 

    Before we dive into what these tips are, we want to note that you should always talk to your doctor for any advice pertaining to your individual situation. These tips are helpful for most people with knee arthritis, but you may need to follow different advice depending on your condition.

    Five tips that can keep you running when you have knee arthritis

    1. Listen to your body — Yes, you may still be able to run despite having arthritis, but your limits won’t be as high as they used to be. You need to pay attention to your body for any signs of pain and slow down or stop when you reach this point. In general, you may want to adopt a new routine that’s slower and takes place on less challenging grounds.
    2. Change your footwear — Lack of support in your feet causes a chain reaction when running that stems from the feet to the ankles, to the knees, hips and even into your back. You’ll want to find some customized footwear or insoles that can help improve support for your knees to reduce pain when running with knee arthritis. Even if you already use custom footwear for running, you might need to make a change when you’ve been diagnosed with arthritis.
    3. Always warm up and cool down — Stretching and taking a walk before running is a good way to prepare your muscles and soft tissue for a run. When your body is more prepared, you’ll put less strain on your knees while running.
      Make sure you stretch and walk after you’re finished too so your muscles can cool back down. Immediately going from running to resting can shock the muscles, which causes tension that just ends up putting strain on the knees.
    4. Try low-impact exercises — Gentle exercises like swimming or yoga exert low amounts of force onto your joints. This can help strengthen the knees without straining them so you’ll be better prepared to go for a run.
    5. Visit a physical therapist — Physical therapists can guide you through exercises and stretches and provide manual mobilization techniques that help reduce pain in the knees and improve your range of motion. Physical therapy also decreases your dependency on surgery and medications as treatments for arthritis. 

    Visit Whatcom Physical Therapy in Blaine, WA, for knee arthritis treatment

    Are you a runner whose knees are hurting from running thanks to arthritis? Our physical therapists at Whatcom Physical Therapy in Blaine can help. Contact our team today for more information about knee arthritis treatment or to schedule an initial appointment.

  • Three tips to shorten auto accident injury treatment process

    Three tips to shorten auto accident injury treatment process

    According to the Insurance Information Institute (III), there were almost 6.5 million car accidents in the U.S. in 2017. Of this total, about 1.9 million led to an injury. If you or someone you know has been injured in a car accident, auto accident injury treatment can help you recover. However, your recovery process could last for an extended period of time, which can be very frustrating. Here are three tips that can help speed up your car accident injury recovery: 

    1.   See a doctor as soon as possible

    Auto accident injury treatment often takes longer when injuries aren’t caught right away. Some accident injuries can take hours or days to show symptoms. Once these symptoms start to appear, it’s likely that your injury will take longer to heal. To help avoid this scenario, you can make an appointment to see your doctor as soon as possible after your accident. This will give the doctor a chance to evaluate you physically, and they may be able to catch an injury before the symptoms begin to appear. In turn, this early diagnosis allows you to start treating the injury sooner, which can speed up the recovery process. 

    2.   Rest your body

    Even if you aren’t injured, a car accident is very stressful both mentally and physically. You might experience muscle stiffness from bracing yourself during the crash, and your mental stress level can increase thanks to dealing with insurance companies, the police and auto repair shops. Resting your body is vital to helping you deal with these mental and physical stressors effectively. 

    It becomes even more important if you do need auto accident injury treatment, since the body tends to do most of its repair work while you’re resting. One benefit of resting to let the body begin healing is that it can actually speed up the healing process. For instance, you might be able to start physical therapy sooner if you’ve already been resting.  

    3.   Find a physical therapist to help you

    After a few days of rest, you’ll want to get moving again to avoid muscle weakness, stiffness and other issues. Physical therapists can help you find ways to get moving again that are beneficial for your auto accident injury treatment. 

    At Panther Physical Therapy, our team can help you start your recovery process with a free screening. This step allows us to learn how your body has been injured, and pinpointing your injury helps us build you a treatment plan that’s personalized to your needs. Our team has many therapy techniques at their disposal, and some methods that we may include in your plan are: 

    Take the next step to get our help with your car accident injury. Contact our team today for more information or to schedule an appointment.

When Was Your Appointment?

We recently changed bill pay providers. Please click the button for the date of your appointment to be directed to the correct online payment portal.